Sunday, March 12, 2017

April Issue of I Like Knitting

The April issue of web magazine I Like Knitting is out, have you seen it yet?


With over 28 patterns, this is a spring issue with lightweight, springy, vintage and even some Easter patterns. Whether it's scarves or shawls or baby stuff you're interested in, this is a great issue. 

I especially like the series 'You're a Gem' that features shawls inspired by birthstones. This edition includes shawls for Alexandrite, Aquamarine, Diamond and Emerald. Which of these is your birthstone? 

Monday, June 4, 2012

Moonlit – Chic Crochet Bag


Sometimes a small bag that will just hold your purse and phone is just perfect for the occasion. This is exactly what I set out to make (ok, I admit it, anything larger and the thing may have been in danger of never getting finished).

I had at the same time been experimenting with some textures anyway, so I just combined a couple of ideas. I had a truly wonderful time making this little bag.

A lot of thought went into the handles and finishing. In the end I decided to go the i-cord way, if you can call it that, it’s pretty thick. The handle doesn’t stand on its own, though, that’s something I still have to work on. Also planning to line the bag just to see how that works out.


As for the flower, I was just trying various things that I could place on the flap, buttons and stuff. But I really liked the way this flower modified the appearance of the whole bag – made it chic, actually – and here it is, sitting pretty on the flap.


Here we are then, Moonlit, the chic crochet bag. Do tell me what you think – honest opinion and critical analysis, please :-).

Friday, May 4, 2012

Easy Baby Bath Robe


I made this tiny little bath robe for the kid and you can see he’s not too happy posing in it.:-) But it was a fun project really.

It’s actually made from two towels – one regular sized (small, actually) and the other a hand towel – both of the same colour. I used the larger one for the body and the smaller one for the hood.


The project involved very little cutting and sewing. In fact the only cutting was for the armholes – just two straight cuts, no shaping. The sewing included attaching the hood to the body and finishing the armholes.

The model was no help – he would absolutely not let me wrap the towel around him to see where the armholes would go. So I just roughly decided where to place them. They were finished with some satiny material for the piping.

You can see that the seams are on the outside. This is because I used the finished edges of the towels as they were and sewn up, they would be bulky, so better outside than in. I didn’t add buttons or tie or anything, the idea is to simply use it like a wrap. But they shouldn’t really be difficult make.

So, here we are, baby bath robe – an easy, one afternoon project.

Wednesday, May 2, 2012

My Little Red Pouch


What first attracted me to this pattern (Swirling bag from Knitting Daily TV) was the use several bright colours all in perfect harmony with each other. And I ended up making it in a single colour! :-)

I used some shiny acrylic and quite like the sheen it gave the bag. Also, I made my stitches through the back loop only – this gave the texture some ridges and slightly changed the bag’s dimensions. The final touch was some ribbon embroidery, also in the same colour, and I was done.

This was a completely fun project to take on and was made as a gift for my mother. I just love how it turned out.

Tuesday, April 24, 2012

Crochet Before Breakfast


My work in progress

Just off the top of my head I can think of at least a dozen things one can do before breakfast – useful, productive, healthy, clever or even just reasonable and customary things. You could walk, jog or exercise. Or meditate. Plan for the day. Or even actually begin the day’s work. If nothing else, you could get a cup of coffee and enjoy the morning air and bird songs.

So, do I do any of these? No, sir, I don’t! Instead, I get out my crochet and get busy. Directly I am out of my bed, I reach for my yarn basket.

Dishes in the sink beg for my attention, the floor is crying to be cleaned, breakfast needs to be fixed, oh, you know all the stuff the average household can blackmail you with. But immune to any of this I plug away with my hook and yarn. I can’t wait to see how it takes shape. It’s all I can think of. I’ve even been dreaming about it. 

But there’s one thing that has to be said for crochet early in the morning, though. As you watch your effort, your labour of love, take shape in your hands, you are sure to be suffused with a warm glow of health and satisfaction that is not very dissimilar to the one to be gained from any of the healthy morning activities listed above.

So crochet before breakfast it is! Now just please tell me you do it too!

Sunday, April 15, 2012

Cardigan for Mom


My mother wanted a sweater that would have to be sort of a cross between a knit sari blouse and a regular cardigan. That meant I would have to come up with the pattern myself. Ok, that’s not really the way it sounds, I mean, I’m not your seasoned knitting designer with patterns for sale. I’m just an occasional (and slow) knitter who takes forever to finish anything. So the idea of having to draw out my own pattern was kind of overwhelming.

I’m also something of a perfectionist, never satisfied with anything. So I actually took longer to make notes for this sweater than to actually knit it (even at my pace).

But the best part of this project was the yarn itself. Soft, warm, bulky, it felt so good to knit. And its bulk meant I could use my largest knitting needles and a gauge of 4 stitches per inch was one of the reasons this project even saw the light of day.

Unlike my sewing, my knitting projects often have a way of not turning out quite like the picture I had in mind and this sweater was no different. Still, I gave my mother what she wanted. This sweater is longer than a sari blouse, but well-shaped (even though you can’t see it in the picture :-)) and is half-sleeved. The only thing I’m really unhappy about is that it doesn’t fit quite as snugly as a blouse. I was so afraid of making it too small and tight that it ended up quite the opposite. Oh, well, live and learn; now I know how to do better next time. So what do you think?

Tuesday, October 25, 2011

Clothespin Bag Recycled from Dress or Top


I’ve always had visions of the extraordinary clothespin bag that I just know I’m destined to make someday, but in the meantime, here’s something to make do…


For years now, I’ve been planning on making a clothespin bag, THE clothespin bag. No design was quite satisfactory and I was just biding my time till I would wake up one day having dreamt of the most adorable design for this bag. Instead, I woke up one day with a desperate need for a bag. There were clothespins everywhere and no bag to put them in and I quite simply needed one immediately. So I put every other project on hold and came up with this quick and easy recipe for a clothespin bag that can be fashioned out of an old dress or top.

This is a picture of the dress that I used. 


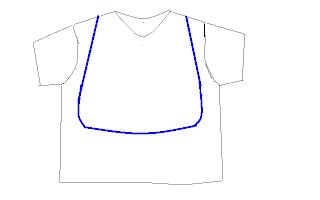
Now turn the top inside out and mark the shape of the bag on it like this.


You can change the shape of the bag to suit your taste, but make sure your pattern includes the necklines and part of both shoulders of the top.

Cut along the lines you just marked with a ¼” seam allowance. You should have two pieces for the front and back of the bag, attached at the shoulder of the dress. (This is the best part of this bag, you are retaining the shoulder and neck of the dress, making your job that much easier as you have less finishing to do.)

Now with the right sides facing, sew along the lines you marked. Trim off the excess. Turn it inside out and the bag part is done! Alternately, you can first cut out the pattern and then sew.

Now to make the straps with which to hang the bag. Cut out two pieces of fabric from the remaining parts of the top to make the straps.

Measure the width of one shoulder of the bag. The width of each strap should be two times the width of the shoulder plus a ½” for seam allowance. So if the shoulder is 1 inch wide, you need to take 2 ½ inches.

The length is up to you. You can make short or long straps and decide on the length accordingly. I made mine about 12 inches long with the extra length hanging rather whimsically. But the thing is, you can make buttonholes anywhere along the length of the straps and make them adjustable.

Fold the fabric you cut out for one strap lengthwise in half. With a ¼” seam allowance, sew along the length and one width. Do this with both pieces, turn them inside out and you should have two tubes like this.


Now oversew along both lengths and the closed width and your straps should be ready for attachment to the bag.


Fold the unfinished end of the strap and sew on to the back of one shoulder. 


Sewing it on like this will give it strength so it can bear the weight of the bag and its contents.

Sew on both straps and the bag should now look like this.


Sew buttons on to the front of the bag at the shoulders. Make buttonholes on the straps at an appropriate level.


Strap the bag conveniently on to your clothesline or a hanger or wherever you choose. The neck of the top/dress you used becomes the opening of the bag. 


There, wasn’t that really easy?