I’ve always had visions of the extraordinary clothespin bag that I just know I’m destined to make someday, but in the meantime, here’s something to make do…
For years now, I’ve been planning on making a clothespin bag, THE clothespin bag. No design was quite satisfactory and I was just biding my time till I would wake up one day having dreamt of the most adorable design for this bag. Instead, I woke up one day with a desperate need for a bag. There were clothespins everywhere and no bag to put them in and I quite simply needed one immediately. So I put every other project on hold and came up with this quick and easy recipe for a clothespin bag that can be fashioned out of an old dress or top.
This is a picture of the dress that I used.
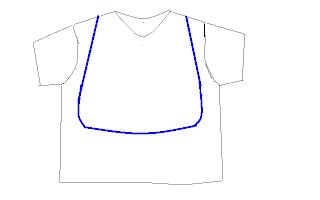
Now turn the top inside out and mark the shape of the bag on it like this.
You can change the shape of the bag to suit your taste, but make sure your pattern includes the necklines and part of both shoulders of the top.
Cut along the lines you just marked with a ¼” seam allowance. You should have two pieces for the front and back of the bag, attached at the shoulder of the dress. (This is the best part of this bag, you are retaining the shoulder and neck of the dress, making your job that much easier as you have less finishing to do.)
Now with the right sides facing, sew along the lines you marked. Trim off the excess. Turn it inside out and the bag part is done! Alternately, you can first cut out the pattern and then sew.
Now to make the straps with which to hang the bag. Cut out two pieces of fabric from the remaining parts of the top to make the straps.
Measure the width of one shoulder of the bag. The width of each strap should be two times the width of the shoulder plus a ½” for seam allowance. So if the shoulder is 1 inch wide, you need to take 2 ½ inches.
The length is up to you. You can make short or long straps and decide on the length accordingly. I made mine about 12 inches long with the extra length hanging rather whimsically. But the thing is, you can make buttonholes anywhere along the length of the straps and make them adjustable.
Fold the fabric you cut out for one strap lengthwise in half. With a ¼” seam allowance, sew along the length and one width. Do this with both pieces, turn them inside out and you should have two tubes like this.
Now oversew along both lengths and the closed width and your straps should be ready for attachment to the bag.
Fold the unfinished end of the strap and sew on to the back of one shoulder.
Sewing it on like this will give it strength so it can bear the weight of the bag and its contents.
Sew on both straps and the bag should now look like this.
Sew buttons on to the front of the bag at the shoulders. Make buttonholes on the straps at an appropriate level.
Strap the bag conveniently on to your clothesline or a hanger or wherever you choose. The neck of the top/dress you used becomes the opening of the bag.
There, wasn’t that really easy?


No comments:
Post a Comment